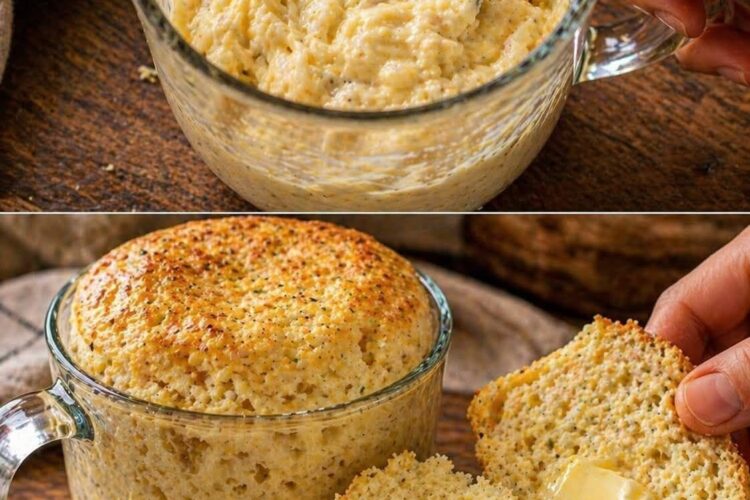
Microwave Mug Bread
Microwave mug bread is a fast, single-portion bread made without yeast or oven. It uses chemical leavening (baking powder or baking soda) to create a soft, bread-like texture in just a couple of minutes. It is not identical to traditional oven bread, but when done correctly it gives a warm, soft, satisfying result suitable for quick meals or snacks.
This version explains everything in depth: ingredient roles, mixing technique, texture control, cooking science, and troubleshooting.
1. Understanding What You Are Making
Traditional bread relies on:
- Yeast fermentation
- Gluten development
- Long proofing time
- Oven heat expansion
Microwave mug bread relies on:
- Baking powder (rapid gas release)
- Quick starch gelatinization
- Microwave steam heating
So the structure is:
- Softer
- Slightly denser
- More like a hybrid between bread and soft cake
It is best consumed fresh because it loses softness quickly.
2. Ingredients and Their Roles
Dry Ingredients
- 4 tablespoons all-purpose flour (maida)
- 1/2 teaspoon baking powder
- Pinch of salt
- 1 teaspoon sugar (optional but improves browning and taste)
Role explanation:
- Flour provides structure
- Baking powder creates air bubbles for rise
- Salt enhances flavor balance
- Sugar helps slight browning and soft texture
Wet Ingredients
- 3 tablespoons milk
- 1 tablespoon oil or melted butter
- 1/4 teaspoon vinegar or lemon juice (optional but improves softness)
Role explanation:
- Milk hydrates flour and softens crumb
- Oil/butter prevents dryness
- Acid (vinegar/lemon) reacts with baking powder for extra lift and tenderness
Optional Enhancers
- 1 tablespoon yogurt (improves softness and moisture retention)
- Garlic powder or herbs (for savory version)
- Vanilla or cocoa (for sweet version)
3. Choosing the Right Mug
This step is often ignored but affects results.
Use:
- Microwave-safe ceramic mug
- Capacity: 300–400 ml minimum
- Wide base preferred
Avoid:
- Very narrow mugs (uneven cooking)
- Metal rim mugs (unsafe)
- Overfilling mugs (overflow during rising)
Fill level should be around half to two-thirds of mug height before microwaving.
4. Step-by-Step Method
Step 1: Dry Mixing (Very Important)
Add to mug:
- Flour
- Baking powder
- Salt
- Sugar
Mix thoroughly for at least 20–30 seconds.
Why this matters:
Uneven baking powder distribution causes:
- Uneven rising
- Bitter spots
- Dense patches
Step 2: Add Wet Ingredients
Add:
- Milk
- Oil or melted butter
- Vinegar or lemon juice (if using)
Mix slowly until a thick batter forms.
Step 3: Achieving Correct Batter Texture
Correct texture should be:
- Thick but soft
- Smooth without dry flour patches
- Slightly sticky but pourable with spoon
If too dry:
Add milk 1 teaspoon at a time
If too wet:
Add a pinch of flour
Step 4: Mixing Technique
Stir gently but thoroughly:
- Scrape bottom of mug
- Ensure no dry flour remains
- Avoid over-whisking once smooth
Overmixing can:
- Develop too much gluten
- Make bread chewy instead of soft
Step 5: Leveling the Batter
- Smooth the top with a spoon
- Tap mug lightly on counter 2–3 times
This removes air pockets and helps even cooking.
5. Microwave Cooking Process
Power settings:
- High power (800–1000W typical microwave)
Cooking time:
- Start: 60 seconds
- Check consistency
- Add 10–15 seconds if needed
Total time usually: 60–90 seconds
What happens inside microwave:
- First 20–30 seconds: baking powder activates, gas bubbles form
- 30–60 seconds: starch gelatinizes, structure sets
- After 60 seconds: moisture stabilizes
- Overcooking beyond this causes dryness
Signs it is done:
- Surface looks dry and set
- Bread pulls slightly away from mug edges
- Toothpick comes out mostly clean
- Slight spring when pressed
6. Cooling Stage
Let it rest:
- 1–2 minutes inside mug
Why:
- Steam finishes cooking inside
- Structure stabilizes
- Easier to remove cleanly
Then gently remove using a knife or spoon.
7. Texture Expectations
Proper result should be:
- Soft interior
- Light crumb (not airy like oven bread)
- Slightly chewy edge
- Mild flavor ready for toppings
It should not be:
- Rubbery (overcooked)
- Doughy (undercooked)
- Dry (too much flour or time)
8. Common Problems and Solutions
Problem: Bread is rubbery
Cause:
- Overcooked in microwave
Fix:
- Reduce cooking time next attempt
- Use 10–20 second increments only after 60 seconds
Problem: Bread is raw inside
Cause:
- Too short cooking time or thick batter
Fix:
- Flatten batter slightly
- Increase time in small steps
Problem: Bread does not rise
Cause:
- Old baking powder or uneven mixing
Fix:
- Replace baking powder
- Mix dry ingredients thoroughly
Problem: Bitter taste
Cause:
- Too much baking powder
Fix:
- Measure accurately (do not exceed 1/2 tsp)
Problem: Dry bread
Cause:
- Too much flour or overcooking
Fix:
- Add 1 teaspoon extra milk next time
- Reduce microwave time
9. Variations (Detailed)
1. Savory Garlic Bread Mug Version
Add:
- Garlic powder or minced garlic
- Oregano or mixed herbs
- Black pepper
- Optional cheese cubes
Result:
Soft garlic bread-style mug bread
2. Cheese Mug Bread
Add:
- 1–2 tablespoons grated cheese inside batter
Effect:
- Slightly gooey texture
- Rich savory flavor
3. Sweet Mug Bread
Add:
- Extra 1–2 teaspoons sugar
- Vanilla essence
- Optional chocolate chips or raisins
Effect:
- Soft dessert-style bread
4. Whole Wheat Version
Replace maida with whole wheat flour:
- Slightly denser
- More earthy taste
- More fiber
Add extra 1 teaspoon milk if too dry.
5. Egg Version (Richer Texture)
Add 1 beaten egg:
- Softer crumb
- More structure
- Slight cake-like texture
Reduce milk slightly to balance moisture.
10. Pro-Level Tips
- Always pre-mix dry ingredients well
- Use fresh baking powder (key factor)
- Do not overfill mug (prevents overflow)
- Adjust microwave time for your machine
- Slight undercooking is better than overcooking
- Add yogurt for extra softness and moisture retention
- Let it rest before eating for better texture
11. Serving Ideas
Microwave mug bread can be used as:
- Quick sandwich base
- Buttered toast substitute
- Side bread for soup
- Garlic bread snack
- Sweet bread with jam or honey
12. Final Result Summary
If done correctly, you get:
- Warm, soft bread in under 2 minutes cooking time
- Mild flavor adaptable to sweet or savory use
- Convenient single-serving portion
- Fresh homemade taste without oven or yeast
