A weeknight chicken I keep coming back to
There are certain meals I end up repeating more than I planned, and these air fryer chicken tenderloins are one of them. They’re the kind of thing I started making just because I needed something quick, but over time they became a regular part of my kitchen routine. The main reason is simple: they come out juicy every single time without much effort, and they fit into almost any meal I’m putting together.
On busy days, I like recipes that don’t need constant attention, and this one fits that idea perfectly. I can season the chicken, place it in the air fryer, and focus on everything else while it cooks. No flipping pans, no checking constantly, and no worrying that it will dry out if I look away for a minute.
What I also like is how flexible the final result is. I can serve these tenderloins as a full dinner with a couple of sides, slice them for salads, or even toss them into whatever quick meal I’m assembling later in the week. They don’t feel “stuck” in one role, which makes them especially useful when I’m meal planning.
Why I rely on the air fryer for chicken tenderloins
Chicken tenderloins already have a natural advantage because they’re smaller and more delicate than regular chicken breast pieces. That means they cook faster and more evenly, which helps avoid that dry or rubbery texture that sometimes happens with lean chicken.
Using the air fryer just makes that process easier. The hot air circulates around each piece, so the chicken cooks from all sides at once. I don’t need to babysit it or keep checking the pan. It just works in the background.
To help everything come together, I use a light coating of oil and cornstarch along with basic spices. The cornstarch is especially helpful because it helps the seasoning stick better and gives a slight outer texture without turning it into a breaded recipe. It keeps things light while still giving good flavor and structure.
The simple ingredients I always reach for
This recipe doesn’t depend on anything complicated. These are the ingredients I use every time:
- Boneless skinless chicken tenderloins
- Olive or avocado oil
- Cornstarch
- Kosher salt
- Smoked paprika
- Dried oregano
- Black pepper
- Garlic powder
- Onion powder
- Avocado oil spray
That’s it. Nothing fancy, just basic pantry spices and chicken. The combination is what makes it work so well.
Getting everything ready before cooking
One thing I’ve learned is that this recipe goes best when everything is ready before I even turn on the air fryer. It only takes a few minutes, but it helps the cooking process go smoothly.
First, I always pat the chicken dry. This step matters more than it seems because removing excess moisture helps the seasoning stick better and improves the texture once it cooks.
Next, I place the chicken into a large bowl and add the oil, cornstarch, salt, pepper, smoked paprika, oregano, garlic powder, and onion powder. I mix everything together until each piece is evenly coated. I usually use my hands for this because it helps distribute everything more evenly than a spoon.
At this stage, the chicken already smells seasoned and ready, even before cooking begins.
Preheating the air fryer makes a difference
Before cooking, I always preheat the air fryer to 400°F. It only takes a few minutes, but I don’t skip it because it helps the chicken start cooking immediately once it goes in.
Once preheated, I lightly spray the basket with avocado oil spray. This small step helps prevent sticking and makes cleanup easier later.
Cooking the chicken tenderloins
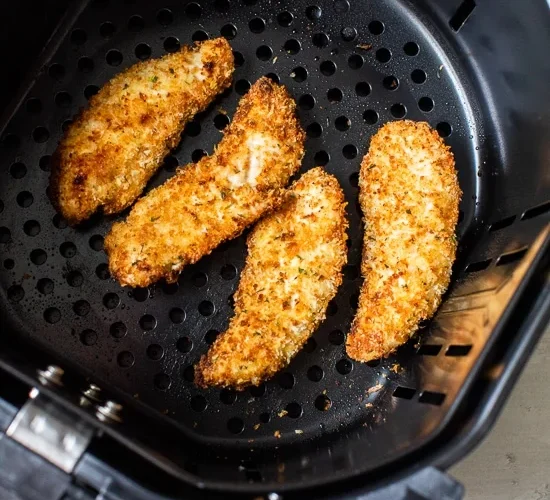
When the air fryer is ready, I arrange the chicken in a single layer inside the basket. This part is important because overcrowding can stop the air from circulating properly, and that affects how evenly the chicken cooks. If I’m making a larger batch, I simply cook it in rounds instead of trying to fit everything at once.
The chicken cooks at 400°F for about 10 minutes. I usually flip it halfway through so both sides get evenly cooked and lightly crisped on the outside.
By the end, the chicken should reach an internal temperature of 165°F. Depending on the size of the tenderloins and the air fryer model, timing can vary slightly, but it’s usually very close to that 10-minute mark.
After cooking, I let the chicken rest for a couple of minutes before serving. This helps the juices settle so the pieces stay tender when cut.
What I serve with it on regular days
This chicken fits into so many meals that I rarely serve it the same way twice in a row.
Most of the time, I pair it with simple vegetables. Roasted or air-fried broccoli, green beans, carrots, or a fresh salad all work really well. When I want something lighter, steamed corn or peas also works without much effort.
For a more filling plate, I’ll add rice, mashed potatoes, roasted potatoes, sweet potatoes, or even macaroni and cheese. It really depends on what I have available and how much time I want to spend.
I also like keeping a few sauces nearby because they change the whole flavor of the meal. Honey mustard, BBQ sauce, ranch-style dips, buffalo sauce, or even ketchup all work depending on the mood.
Turning leftovers into something new
One of the best things about making a batch of these tenderloins is how easily they can be reused later. Once cooked, I often chop them up and add them into different meals throughout the week.
They work well in salads, especially when I want something quick but filling. They also fit nicely into soups, casseroles, wraps, and sandwiches. Sometimes I even use them in pasta dishes or quick rice bowls when I don’t feel like starting from scratch.
Having cooked chicken ready in the fridge makes everything faster later on, which is part of why I keep coming back to this recipe.
Small tips that make it better
Over time, a few habits have made this recipe even more reliable for me:
- Always pat the chicken dry before seasoning
- Don’t overcrowd the air fryer basket
- Flip halfway through cooking
- Let the chicken rest for a couple of minutes after cooking
- Cook in batches if needed instead of stacking
These small steps don’t take extra time, but they help keep the chicken consistently juicy and evenly cooked.

Air Fryer Chicken Tenderloins
Cuisine: AmericanDifficulty: Easy4
servings5
minutes10
minutes135
kcal15
minutesJuicy, tender air fryer chicken tenderloins seasoned with simple spices and cooked quickly for an easy high-protein meal.
Ingredients
1 lb boneless skinless chicken tenderloins
1 tbsp olive or avocado oil
2 tsp cornstarch
1 tsp kosher salt
1/2 tsp smoked paprika
1/2 tsp dried oregano
1/2 tsp black pepper
1/2 tsp garlic powder
1/2 tsp onion powder
Avocado oil spray
Directions
- Preheat air fryer to 400°F for a few minutes and lightly spray the basket with avocado oil spray.
- Pat chicken dry with paper towels.
- Add chicken to a bowl with oil, cornstarch, salt, smoked paprika, oregano, pepper, garlic powder, and onion powder. Toss until evenly coated.
- Add chicken to a bowl with oil, cornstarch, salt, smoked paprika, oregano, pepper, garlic powder, and onion powder. Toss until evenly coated.
- Air fry at 400°F for about 10 minutes, flipping halfway through.
- Check that internal temperature reaches 165°F.
- Let rest for a couple of minutes before serving.
Notes
- Do not overcrowd the basket; cook in batches if needed.
- Cooking time may vary slightly depending on air fryer size and tenderloin thickness.
- WW Points: 1 (entire recipe is 5 points).
- Best served fresh but also works well for meal prep.
- Nutrition (per serving): ~135 kcal, 25g protein, 1g carbs, 4g fat, 200mg sodium.
