🟡 Introduction
Sourdough bagels are a beautiful combination of traditional baking and fermentation. Unlike commercial yeast bagels, these rely on a natural sourdough starter, which gives them a slightly tangy flavor, improved digestibility, and a richer texture.
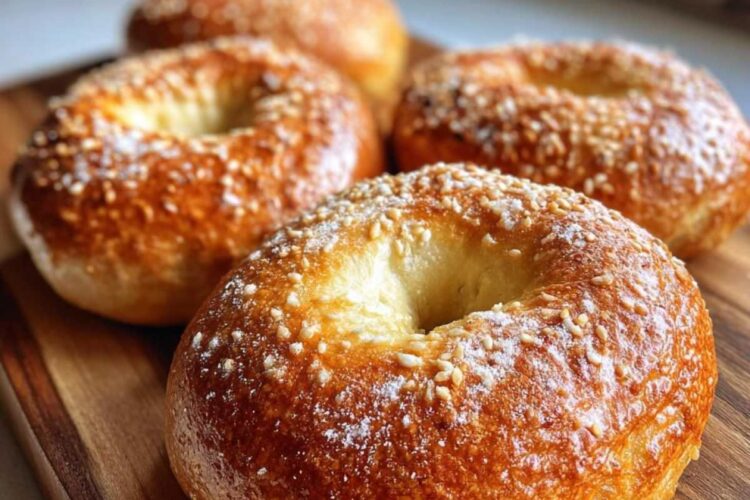
The defining characteristics of a great bagel are:
- A chewy interior
- A shiny, golden crust
- A distinct ring shape
- A slightly crisp exterior
The secret lies in boiling the bagels before baking, which creates that signature texture.
🌟 Why This Recipe Works
- Sourdough starter adds flavor and natural rise
- High-gluten dough creates chewiness
- Boiling step gelatinizes the crust
- Cold fermentation enhances taste and structure
🛒 Ingredients
For the Dough:
- 500g bread flour (high protein preferred)
- 250g water (room temperature)
- 100g active sourdough starter (fed and bubbly)
- 10g salt
- 20g honey or sugar
For Boiling:
- 2 liters water
- 1 tablespoon honey or sugar
- 1 teaspoon baking soda
Optional Toppings:
- Sesame seeds
- Poppy seeds
- Everything bagel seasoning
- Sea salt
🧰 Equipment Needed
- Mixing bowl
- Kitchen scale
- Dough scraper
- Baking tray
- Parchment paper
- Large pot
- Slotted spoon
🧪 Understanding Sourdough Starter
Your starter should be:
- Active and bubbly
- Fed 4–6 hours before use
- Able to float in water (optional test)
Why it matters:
A weak starter will result in dense bagels.
🥣 Step 1: Mix the Dough
In a large bowl:
- Combine water, starter, and honey
- Stir until dissolved
Add flour and salt:
- Mix until a rough dough forms
✋ Step 2: Knead the Dough
- Knead for 8–10 minutes
Goal:
- Smooth, firm dough
- Slightly stiff (firmer than bread dough)
⏳ Step 3: Bulk Fermentation
- Cover and let rest at room temperature for 4–6 hours
During this time:
- Dough should rise slightly (not double)
❄️ Step 4: Cold Fermentation
- Transfer dough to fridge overnight (8–12 hours)
Benefits:
- Better flavor
- Easier shaping
- Improved texture
🔪 Step 5: Divide the Dough
- Remove dough from fridge
- Divide into 8 equal portions
Shape each into a ball.
🔄 Step 6: Shape the Bagels
Two methods:
1. Poke Method:
- Poke a hole in center
- Stretch gently
2. Rope Method:
- Roll into rope
- Join ends
Tip:
Hole should be larger than expected—it shrinks during proofing.
⏳ Step 7: Final Proof
- Let shaped bagels rest for 30–60 minutes
They should:
- Puff slightly
- Pass the float test (optional)
🔥 Step 8: Prepare Boiling Water
- Bring water to boil
- Add honey and baking soda
🥯 Step 9: Boil the Bagels
- Boil 2–3 bagels at a time
Time:
- 30 seconds per side (lighter texture)
- 60 seconds per side (chewier texture)
Remove with slotted spoon.
🌾 Step 10: Add Toppings
- Place boiled bagels on tray
- Sprinkle toppings while wet
🔥 Step 11: Bake
- Preheat oven to 220°C (425°F)
Bake for:
- 20–25 minutes
Until:
- Golden brown
- Firm crust
⏳ Step 12: Cool
- Let cool on rack for at least 20 minutes
🍽️ Serving Suggestions
- Cream cheese
- Butter
- Peanut butter
- Sandwich fillings
🔄 Variations
1. Whole Wheat Bagels
- Replace part of flour
2. Sweet Bagels
- Add cinnamon and raisins
3. Cheese Bagels
- Add cheese topping
🧠 Expert Tips
- Use strong flour
- Don’t skip boiling
- Cold ferment for best flavor
- Shape tightly
- Bake until deeply golden
❌ Common Mistakes
- Weak starter
- Skipping boiling
- Overproofing
- Not kneading enough
- Baking at low temperature
🧊 Storage
Room Temperature:
- 2–3 days
Freezing:
- Up to 2 months
🔥 Reheating
- Toast for best texture
🍱 Meal Ideas
- Breakfast sandwiches
- Lunch bagels
- Snack with spreads
🌟 Texture Guide
- Proper bagel: chewy + crisp
- Underboiled: soft crust
- Overproofed: flat shape
🍴 Presentation Tips
- Even shape
- Golden color
- Generous toppings
